Pages

Showing posts with label Science. Show all posts

Wednesday, June 30, 2021

Wind racer - Science

 Aim:

To make a wind racer.


Research:

Youtube


Equipment:

-Trolley

-Bamboo/metal rod

-Cardboard

-Newspaper

-Tape

-String

-Plastic Bag

-Popsicle Sticks


Method:

1.Put the metal rod in the trolley.

2.Cut pieces of material into squares.

3.Draw on the paper for creativity.

4.Gather and cut pieces of tape and string.

5.Stick the materials to the metal rod.


Result:


Discussion: 

The four forces acting on the wind racer were:

Gravity: The wind racer didn't fly in the sky, and the wind made it fall over.

Support: The ground kept the wind racer up.

Push: The wind pushed the wind racer.

Pull: The wind racer stopped.

Why did it slow down?

I think the main reason was that we didn't have enough spacing for the bag to catch the air, another reason is that the leaf blower was too far away and was a bit too weak to reach the wind racer.


Conclusion:

The wind racer didn't exactly go the first time we did it, but once we reset and tried again it kinda worked but didn’t go that far. Next time I would probably angle on how I am blowing onto the wind racer so it could make it a bit more further or make the plastic bag a bit looser so it can catch some more wind.


Friday, March 26, 2021

Making salt crystals - Science


 Aim: To produce copper sulfate salt by reacting copper oxide with an acid.

Equipment: 

  • Copper oxide powder
  • Dilute (0.5 mol L-1) sulfuric acid
  • 50ml measuring cylinder
  • two 100ml beakers
  • Bunsen burner
  • Tripod
  • Gauze mat
  • Funnel
  • Filter paper
  • Thermometer
  • Spatula
  • Evaporating basin
  • Stirring rod

Method:

  1. Add 20ml of sulfuric acid to a 100ml beaker. Heat the acid until it reaches 70℃. Turn off your bunsen burner.
  2. Once heated, use a spatula to add pea-sized portions of copper oxide to the beaker. Stir the mixture for 30 seconds
  3. Repeat step 2 until no more will dissolve. Allow the beaker to cool.
  4. Fold the filter paper and place it in the funnel. Place the filter funnel into the second beaker.
  5. Make sure the beaker is cool enough to hold at the top. The contents should still be hot. You may need your teacher to complete this step.
  6. Gently swirl the contents of the beaker to mix, and then pour into the filter paper in the funnel. Allow filtering through.
  7. Rinse the beaker you used to heat the mixture previously, and place it back on top of the tripod filled with 50-60ml of water.
  8. Place the evaporating basin on top of the beaker and carefully pour some of the solutions from the beaker into the evaporating basin.
  9. Gently heat the beaker until the solution in the evaporating basin has reduced by half.
  10. Leave the evaporating basin to cool. Once cool, move the evaporating basin to a warm place where it will not be disturbed (i.e. a window-still) and observe over the next few days. Blue copper sulfate crystals should form.

Results:

The end results turned out great and actually turned into crystals.

Discussion:


A Copper (oxide) + sulfuric (acid) >Water + copper sulfate.

Copper oxide and sulfuric added together makes water then the water turns into copper sulfate (crystal)


Conclusion:

That the acid actually made into crystals, and the chemicals reacted together.

Monday, February 22, 2021

Model atoms - science

 Aim: To make a model atom

Method: 

1. Choose an atom to make (one between Hydrogen and Neon)

2. Work out how many protons, neutrons and electrons it has.

3. Assign protons and neutrons to a particular colour bead.

4. Get a ball of blue tac and stick the protons and neutrons to this to make your nucleus.

5. Cut out the appropriate electron shells and draw on the electrons with vivid.

6. Connect the nucleus and electron shells with a piece of string.

7. Create a label to go above the model so people know what you have created

Results:


Discussion:
The atomic number for Helium is 2 and the mass number is 4. The number of protons, electrons and neutrons is 2. The electron is 2 on the inside and 0 on the outside. The atomic number of helium is 2, meaning each atom of helium has two protons and helium is the second-lightest element.


Conclusion:
The experiment did work, next time if I do this maybe use smaller beads and have a lighter colour so you can see the electrons.


Monday, November 23, 2020

Distallation - Chemicals & chaos


                                                               Distillation

Recap:  Last lesson we learnt that the process of evaporation is when a liquid turns into a gas. So we can separate a solution, by evaporating away the solvent to learnt a solute (solid). 

But what if we want to collect gas?? When we trap the gas and turn it back into a liquid this is called condensation.

What is it?

  • Evaporation: heating a liquid, turns to a gas
  • Condensation: cooling down a gas, turn into a liquid.
Experiment:                                  Separating a mixture using distillation
Aim: To separate a solute from a solvent in a solution using distillation.
Equipment: 
  • A solution of saltwater
  • Conical flask
  • Heatproof mat
  • A delivery tube and bung
  • Bunsen burner
  • Tripod
  • Gauze mat 
  • Retort stand
  • Boss head and clamp
  • Boiling tube
Method:
  1. Set up the equipment as shown in the diagram
  2. Add approximately 50 ml of saltwater to your conical flask
  3. Light your bunsen burner. Open the air hole and gently push the bunsen burner under the tripod
  4. Heat the solution until most of the solvent has been evaporated. Turn off your bunsen burner.
Hypothesis: When the coke is heated the sugar will solidify and stay in the flask and the liquid will be evaporated and travel all the way to the test tube and cool.

Observations: As soon as we put the Bunsen burner on the coke was already boiling, when the coke started to evaporate it was transferred through the bung and into the tube where it cools and turns into clear brown liquid.

Conclusion: Coke Zero has had less dissolved substances, when normal coke had more dissolved solids which was sugar.

Monday, November 9, 2020

Serial Dilution

 Aim: To make a dilution series to investigate concentration.

Hypothesis: I think that the potassium permanganate will slowly dilute as we tip 5 ml of every test tube into the next test tube.

Equipment:

  • A potassium permanganate crystal
  • Six large test tube
  • Tweezers
  • A plastic transfer pipette
  • A test tube rack
  • 10 ml measuring cylinder
Method:
  1. Place 6 test tubes in a test tube rack. Label the rack with numbers 1-6
  2. Using the measuring cylinder, fill test tube 1 with 10 ml of water. Fill the remaining test tube with 5 ml of water.
  3. Using your tweezers, add a single crystal of potassium permanganate to test tube 1
  4. Gently shake the test tube until the crystal has dissolved
  5. Using the transfer pipette, carefully remove exactly 5 ml from test tube 1 and pour it into test tube 2
  6. Rinse the transfer pipette thoroughly to ensure that no purple solution remains
  7. Gently shake test tube 2 and repeat the transfer process, transferring exactly 5 ml of solution from test tube 2 to test tube 3.
  8. Rinse the pipette again and repeat the transfer process for test tubes 4, 5 and 6.
Discussion:
Which was most dilute? Test tube 6
Least diluted? Test tube 1
Most concentrated? Test tube 1
Least concentrated? Test tube 6
How fo you know? With the most diluted the colour of the liquid has less colour to it and the most concentrated is the brightness of the liquid.

Monday, November 2, 2020

Filtration Experiment


Aim: To separate a solution from a precipitate (precipitate is the name for a solid that forms in a liquid during a chemical reaction.) 
 
Solvent - Thing doing the dissolving (liquid)
Solute - Thing being dissolved (solid)   
Solution - A mixture that is formed.
Filtration - Separates particles based on size.
Filtrate - Liquid after it has been filtered.
Mixture - 2 or more substances together
Solubility - Ability to dissolve.
Hypothesis: What do you think will happen 

Equipment:
  • Copper sulfate
  • Conical flask
  • Stirring rod
  • 200ml beaker
  • Funnel
  • Filter paper
Method: 
  1. Pour approximately 50ml of copper sulfate solution into a beaker. 
  2. Add the same volume of sodium carbonate solution. A reaction will happen, you should see a cloudy blue precipitate form. Called copper carbonate.
  3. Watch demo then fold filter to fit inside the funnel.
  4. Place the funnel with the filter paper inside of it, into the mouth of a conical flask.
  5. Stir the mixture in the beaker, then carefully pour it into the funnel.
  6. Observe what happened.
Observation and Discussion: What you saw happen and why do you think it happened?
When you add the liquids together they start making a bright blue coloured liquid. When you start to filter the liquid through the filter paper there are blue solids on the top and clear liquid coming from the bottom, the reason is that the blue cannot fit through the filter paper because it has large particles in it but the clear liquid has small particles which fit through the filter paper.


Monday, September 21, 2020

Expands - Hurumanu 3

 In science web, we have been looking into conduction and expansion. We had to make a stop motion about one of the topics (expansion, conducts, convection). We had to show an example of the topics, we had to make it clear so that others could tell what was happening in the slide.


In this slide, we chose to do the expansion, for the example the tube is cold and the ball doesn't fit, then once the tube is heated it expands and the ball fits. The heat gives the tube energy which the energy makes the tube expand and makes it big.

Thursday, May 28, 2020

Samoan Language week

This week is Samoan language week so my wananga class have been looking at different topics about Samoan and its culture. The topic I chose was art/tattoo.

What interested you about this topic? Well, the reason why I chose art was because of how every design that's on the mats or wherever the design it's on it has each meaning.

3 key ideas I have learnt about this topic: 

1. Only tattoo designs can be work by Samoans
2. It is disrespectful if you display their symbols and design
3. The design means many things

Why is this significant to the people of Samoa? The tattoo and designs of the Samoa islands represent community, power, respect, honour and is a mark of pride that can only be worn by Samoans. 

How does this topic compare to New Zealand's equivalent?

Samoans design has more detail in them than what Maori arts, but Maori arts have more creativity in them. They are both beautiful designs hand both have meaning in their arts.


Environmental Sustainability

Environmental sustainability is a rate of renewable resource harvest, pollution creation, and non-renewable resource that can be continued. If they cannot be continued indefinitely then they are not sustainable (cannot be reused over again). So here is a google drawing of environmental sustainability:


Wednesday, May 20, 2020

Lockdown

During quarantine, I had done a lot of things and had mostly chilled.  The best part of the lockdown was that I could sleep in, baking, spending time with family and going for walks. The worst thing about the lockdown is that we had to wake up early for video calls, all day with my little brother and doing school work.

During lockdown for fitness, my family and I went for bike walks every day and I worked on my skills for netball and volley. My family and I would play soccer games or handball, we would sometimes bike to go check on my great grandparents.


This is the cake I made for my great grandfather

From Bike Riding to Bike Racing - I Love Bicycling


Tuesday, March 10, 2020

Cow Eye dissection

Aim: To look at a cows eye and the main parts of the eye.

Equipment:
  1. Dissection scissors
  2. Gloves
  3. Cows eye 
  4. Tweezers


Method:
  1. Remove bit of the tissue
  2. Gently puncture the eye and cut around the cornea
  3. Remove the humour from the eye
  4. Cut the rest of the eye in half
  5. And get rid of the retina
Findings:
While cutting the eye there was a lot of fluid coming out of it, There was also jelly called the humour. What I found was that dissecting the eye is very disgusting at first but when you see the rest of the eye it's really pretty and fun.

Tuesday, March 3, 2020

Investigate light

Investigate light

What is the fastest way to travel through the universe?
A Light 

What is light speed? 
299 792 458 m / s

Define optical science?
The study of the light

What is fibre optics?
A thin piece of glass 

Name three instruments that help us see very small objects or objects far away.
  1. Telescope
  2. Microscope
  3. Magnifying glass
  4. Spy glasses
  5. Glasses
  6. Sunglasses
  7. Camera
  8. Binoculars 


Wednesday, February 26, 2020

Sound experiment

Aim: To test my hearing 

Hypothesis: That my hearing would be really bad

Method:


  1. Listen to the sound test
  2. Record what my hearing level is

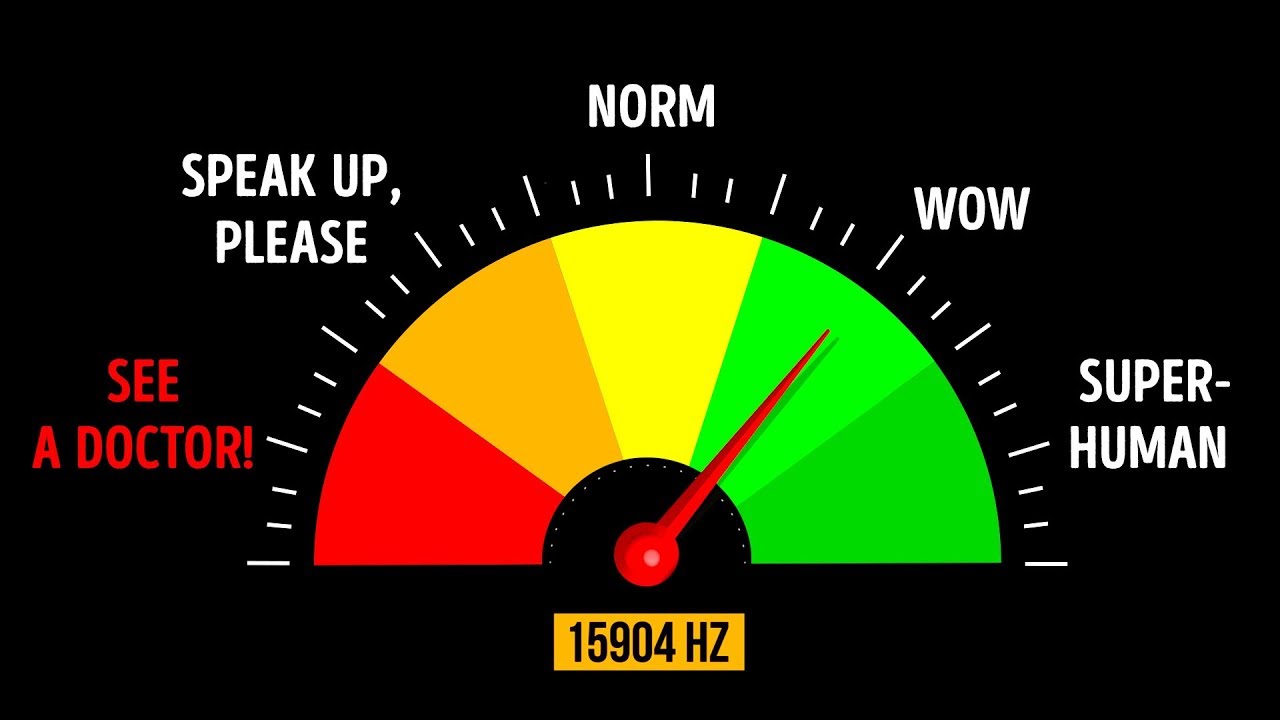
Finding: I found out that my hearing is actually really good, it's not bad. At the start of the test, I was worried that it would go bad but just as soon as I thought that it going to be bad started to hurt my ears. Here are the levels on the test:
I started hearing at 2 spaces from super-human

Image result for cool hearing test are you a superhuman


Tuesday, February 18, 2020

Definition of the scientific method

18/02/20
      Hurumanu 5: Making waves
      
      Aim: Thing that you are trying to find out
      Hypothesis: An educated method guess
      Equipment: Material used for the experiment
      Steps: The order in which you carry out the experiment
      Finding: What you found out on the experiment
      Conclusion: Finding and research summarised together.

Is the hypothesis correct: My hypothesis was that the                        marshmallow would fly and would be launched across the room
This was incorrect because the only length that the marshmallow went to was to the table across to me which wasn't that far so no my hypothesis was incorrect.

Wednesday, February 12, 2020

Research project- energy


  1. Light energy- The energy of the electromagnetic waves. Found in microwaves, x-ray, light bulbs and fire.
  2. Heat energy- Caused by the movement of particles. Found in all hot objects.
  3. Sound energy- Energy produced by vibrating objects. Examples are speech, ultrasound, music, animals and speakers
  4. Chemical Potential energy- Energy stored in the bonds between particles. Found in substances like petrol, food and batteries.
  5. Electrical energy- The movements of electrically charged particles. Found in wires, generators, lightning and eels.
  6. Gravitational Potential energy- Energy stored in objects due to their height above the ground.
  7. Kinetic energy- Energy due to the motion of an object. Eg. moving cars, running, swimming, roller coasters and helicopters.
  8. Elastic Potential energy- Energy stored in stretched or squashed objects. Examples are strings, rubber and Bungy jumps.


Sunday, November 10, 2019

Renewable energy

In science, we had to learn about different types of renewable energy and what they are used for. We had to make a dlo or a normal blog about each of the renewable energy's so here is my slide: 


Cliate change


What places will be affected?
Were places are already flooding

What else do we need to think about?
Islands and where they're lower building

What other places around NZ will be affected?
Coastal areas

What does this do to our drinking water?
Adds more salt

What are the main concerns?
 
  1.   Drinking water
  2. Floodings

What can we do?
  1.  To use fewer fossil fuels
  2.    Walk more often
  3.   Cut home energy 

What is the one, silver bullet solution?

There is no solution

What is the mix of things we need to start doing?
  1.   Using electric vehicles
  2.   Use electric heating
  3. Renewable energy
What are 3 others you can think of?
  1.   Walking or biking
  2. Using fewer fossil fuels
  3.   Use solar power

Thursday, October 17, 2019

Wind experiment

Measuring weather.

Definitions:


  1.  Anemometer:
  2. Beaufort wind scale:

Anemometer

MATERIALS


4 dishes 

  1.   2 sticks
  2.   Cellotape
  3. Pin  
  4.   Pencil (rubber end)
  5. Plastic round lids

STEPS

  1.   Grab the 2 stick and form them as across the tape them in the middle 
  2.   Tape the plastic lids to the sticks (2 on each end)
  3.   Put the pin through the middle of the sticks and tape
  4.   Grab the pencil and put the pin inside the rubber end of the pencil
Groups size: 5 
Roles:
  • Timekeeper
  • Counter
  • Recorder
  • Anemometer Manager
  • Wind Manager
  1. Mount the anemometer in a place that has full access to the wind from all directions.
  2. When the timekeeper says "Go", the counter in each group will count how many times the marked cup passes them in one minute and write it down.
  3. Repeat the above step four (4) times and record the number of spins on the chart.

FINDINGS

  • Record how many times it spins and record it in the table below.
  • You will need to time them and count the number of spins.


Place name on school grounds                                    Number of Spins in 15 seconds
1.Field0
2.Old J block site7
3.Grass hill6
4.Tennis court gate2

CONCLUSION:

There was not much wind today so the experiment didn't really work, but we did get a bit of wind on the other side of the school. The ones that had the most spins was Old J block and the Grass hill. The one that had the most spins was the Old J block, the second was the Grass hill and then the Tennis courts. Somehow there was less wind comming from the Field. That means the areas that what surrounded got more wind the field was open spaced which had less wind.

Monday, September 23, 2019

New science lab

Aim: To learn how to behave in a science laboratory.

Our R9 class treaty:

  1. Pay attention
  2. Act responsibly around dangerous objects
  3. Do not run in the laboratory
  4. Put your bag under the desk so people don't fall over it
  5. No food or drinks in the laboratory
  6. Do not sniff or taste substances 
Safety in a laboratory:
  1. Follow the instructions given to you by the teacher
  2. You must not enter the laboratory without your shoes
  3. Report all breakages to your teacher
  4. You must never eat or drink in a laboratory
  5.  Shoes must be worn at all times
  6. If you spill something you should tell your teacher immediately
  7.  You should wash your hands after every practical activity
  8. You should know what you are doing. If in doubt ask your teacher
  9. Never taste or sniff chemicals
How do we work in the laboratory:


 100ml Beaker (Used for experiments related by liquid. They have a bung that goes on top)
250 ml conical flask (Use for experiments elated to liquid. Has a bung that goes on top and is fireproof.)
 Spatula (for holding a very small amount of chemical powders) 
                    Test tube tongs (Used to hold hot test tubes)
                    20cm Stirring rod (used to stir and mix any liquids)
            100ml measuring cylinder (used to measure liquids)
               10ml measuring cylinder (used to measure liquids)
                                          Funnel

                                            250ml Beaker

Tuesday, September 17, 2019

2040 Documentary

Today in drama and science we had to work with SH and DS. What we did is watch a documentary in the auditorium. It was called in 2040. The video was about a man and he was telling his daughter about global warming and how we can prevent it from becoming more worse than now.

The documentary took 1 and a half of the periods, so it took very long. The man who was talking was Damon gameau. What he did was travel all around the world and talked to other people and how they prevent global warming. What surprised me was that Bangladesh was very smart, what they did was they had used this box. What it did was it collected the solar energy and then it would save it. Then if the owners wanted to they could share it to others that needed the power. 

At night when they needed power, they would use the box and use the power because what the box did was it saved the power and then when they needed it they could use it. 

In the documentary, they showed children and they had asked them several questions about what they wanted in the future and what they would do to prevent global warming. Most of them had said they wanted to make a thing that only used solar power, some had said we could stop eating animals and eat more of fruits and plants.

What really excited me in the documentary was that they had time travelled and showed what would happen if we do something about global warming and see how beautiful it could look. There would be self drivable cars charged by solar, buildings growing plants all over them. Seeing green everywhere. This is exactly what I really want see in the future. 

What I worry about is if we don't stop that we might all die and we might won't get to achieve that we wanted to see. But he makes it more possible but that is all I have to say it was really amazing but I won't watch it again.